Article and Photos by Mark Godlewski with input from Shauna Burnell
A well-maintained drip irrigation system is the most effective way of watering plants in the Okanagan. It distributes water directly to the root zone with minimum evaporation waste. Drip irrigation using pressure-regulating emitters ensures that the amount of water you require will be available at each emitter. This is particularly important if the area being irrigated is large and/or is not all flat. Efficient Irrigation is one of the Seven Principles of Xeriscape.
Although the general principles of drip irrigation are easy to understand, the combination of differing plant water needs, different soil textures, and various local watering restrictions, can make the scheduling and maintenance of individual drip irrigation systems a bit challenging.
This article assumes that you have a drip irrigation system installed. The article will guide you on how to maintain and adjust your system to minimize water use while maintaining a healthy garden. I refer to imperial units of measurement in many cases because much of our irrigation equipment comes through the US market.
CHECK FOR LEAKS AND MAKE REPAIRS
At the beginning of each irrigation season, and at least once during the season, check the system for leaks. Large leaks will usually make their presence known with jets of water spraying up; making them easy to identify. Small leaks will often give themselves away with unusual wet patches in the soil or mulch.
Repairing the flexible polyethylene tubing that is most commonly used for drip irrigation, takes time but is not difficult. You simply dig out around the break or puncture, cut out a small piece of the damaged piping and replace it with an appropriately sized connector from the store. Be sure not to let dirt get into the line as it can plug up the emitters after the repair. Having a clean rag to lay the cut ends on can help with this. Clamps may be required depending on the repair coupling style you choose.

Fig. 1 – Dripline (built-in) emitters

Fig. 2 – Point source drip emitters
CHECK YOUR EMITTERS
There are two main types of drip emitters: dripline emitters and point emitters.
Dripline (built-in) emitters have drip emitters located at regularly-spaced intervals along a distribution pipe as in Fig 1. Dripline systems are best suited to linear features such as hedges or areas of high-density planting of plants that all require the same amount of water such as a vegetable garden. Dripline emitters formed into a circle are useful for watering large pots or trees. Dripline emitters are available in a variety of spacings from 6” to 24”+ and a variety of flow rates from 0.25 gal/hr to 1 gal/hr.
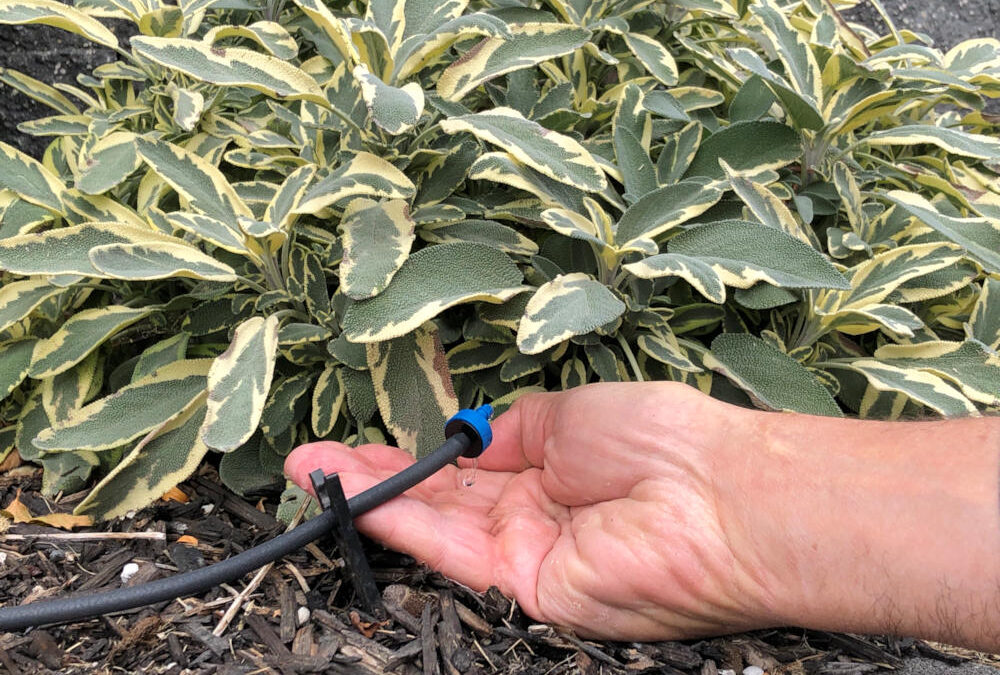
Point source drip emitters are more versatile and useful for most xeriscape designs which feature plants spaced out in informal, natural looking patterns. The emitters generally come in 3 flow rates: 0.5, 1.0 and 2.0 gal/hr. Fig 2 shows an example. They can be tapped directly into larger-diameter flexible supply lines (polyethylene tubing), or they can be run off ¼” spaghetti line that is tapped into the larger supply line. Knowing how many individual emitters can operate off larger or smaller diameter pipe sizes, can be determined with some simple math. Flow charts and irrigation distributors can help you find out how much water can safely flow through whatever size of tubing you are working with. As you add individual emitters, keep a tally of how much water they require in total. Make sure that the total water required by the emitters, does not exceed the water available through your supply line. For example, a typical black poly distribution pipe with an inside diameter of ½ inch should have no more than 300 one gallon per hour emitters to ensure the zone will operate properly.
It is nice to have a detailed plan showing the location of all the distribution lines, emitters and flow rates. This makes it easier to check and maintain the system. Most information is available online or through an irrigation distributor, to determine what kinds of emitters have been used in your garden and roughly where they are located. Point emitters are often colour-coded for their flow rate and have a number stamped on the plastic (small print and may be in gallons or liters). Dripline emitters are generally not marked with flow rates.
Understanding the flow rates of your emitters or built-in dripline, is required information for matching the amount of water delivered, to the plant water needs. There is a lot of variety on the market. I have attached a short video “Drip Emitters in Action ” that shows 5 emitters in action. The three point emitters are colour-coded: red, black, and blue for 2.0, 1.0, 0.5 gal/hr. flow rates respectively. There are also two dripline emitters in the video. The one in the middle is 0.25 gal/hr. and the one on the right is 0.5 gal/hr. For dripline emitters, there is generally no way of telling what their nominal flow rate is unless you have this information from when the product was purchased The two in this video look identical but one is half the flow rate of the other. If you do not know the flow rate, schedule as if the emitters have a 0.5 or 0.6 GPH rate and monitor the soil moisture and plant material.
Almost all the point emitters on the market at this time are pressure regulated which means that regardless of being at the beginning or the end of the line, or at the top or bottom of the hill they will drip at a constant rate. The same is not true of built-in dripline. Many of these are not pressure regulated and so their rates can vary quite a bit from the specifications depending on where they are located.
Generally, you should keep your emitters above the soil level to avoid roots getting in and clogging the flow. For aesthetic reasons, the supply lines are often placed under mulch which is less likely to create issues and generally allows for easy access to “expose” and check the tubing from time to time.
CHECK YOUR SOIL MOISTURE
Once a garden has been in place for a while, the emitters tend to become hidden by mulch and vegetation. Hence it can be difficult to check their flow. The best solution is to look at your garden frequently to see signs of water stress i.e., leaves that are wrinkled, dry, and or discoloured in individual plants. To determine if the plant stress is due to a water problem a soil moisture gauge is a wonderful tool (Fig 3). Stick the gauge into the soil close to the centre of the stressed plant to see if the soil is damp. If the soil near the base of the plant registers as dry in a couple of different places then you need to dig around, find the drip emitter, and probably replace it. Moisture gauges are a great investment, but they are not completely foolproof. Most of the inexpensive ones rely on measuring the very small voltage that is generated between two different metals when the probe is inserted into wet soil with minerals. If the soil is very light and highly organic, it may register as too dry even if it is not. Clean the probe off between measurements with paper towel. A small shovel or hand trowel can often provide the information you need as well. Checking the soil around the plant can take a little longer but looking directly at the moisture below the surface leaves less to interpretation and error.
Fig. 3 – Typical moisture gauge
CHECK YOUR ZONE FLOW RATES
As mentioned above, it is a good idea to know the flow rate of each emitter and then by adding up all emitters within a zone, you will know the flow rate for each zone. Zone flow rates matter because the total amount of water flow you have available for each zone, is restricted by how much your house water supply can provide, and by the size of the supply lines you install. If the emitters on a zone require more water than you have available, the zone will not perform well. Once you have established the total zone flow(s), you can write it down beside the controller and periodically check the rate (at least once a year). If the flow rate is higher than normal you should look for a leak. If it is lower you should clean your filters, check for kinked lines, and check for plugged emitters.
Checking the flow rate is easy with modern water meters. Pick a time when none of your other appliances is using water and then shine a flashlight on the meter. The rate should be showing 0.0000 cubic meters m3/min. It may be slightly higher if you have a slow leak inside your house such as a leaking toilet. Then go and turn on your drip zone and wait for a couple of minutes for the flow to stabilize. You should see a rate of approximately 0.0150 m3/min which equates to 15 liters/min for your drip zone depending on how many emitters you have. Note that if you have a flow rate of more than 20 liters/min and you are using a single ½ inch poly line, you may have too many emitters on your line.
If you have an older water meter you must calculate the flow rate yourself, but it is not too big a deal. Meters in Canada are all set in cubic meters, and mostly they have an odometer type numeric readout. There is some variation in the precision of the numeric readout. Sometimes it shows two decimals, or three, or four. Note carefully where the decimal point is on your meter. Use a watch with a second hand or the timer on your phone. Turn the zone on and then wait for a couple of minutes for the flow to stabilize. Take a reading of the numeric readout and then take a second reading one minute later. Subtract the two numbers and you have your flow rate in m3/min.
ADJUST CONTROLLER TIMING
This is where you can save money and conserve water.
Irrigation frequency, start times, run times, and seasonal percentage are the four main adjustments to most irrigation controllers. Some controllers have a rainfall adjustment, but these are not particularly useful in the Okanagan because most of our effective precipitation tends to happen in the months when the irrigation is off or at a low setting.
Irrigation frequency (weekly, daily, etc.) is mainly controlled by your soil texture and plant types. It can also be controlled by local watering restrictions. Good loam soils can often be watered just once a week for a relatively long run time. Clay soils will need shorter, more frequent watering so that the water does not pool and run off. Very sandy soil will also need more frequent watering (perhaps every second day) because much of the water will tend to go straight down below the normal root zone. Plants with deep root systems will be okay in this scenario. Containers also tend to need more frequent watering because of their limited storage capacity.
Start times are relatively straightforward. Except for special situations, irrigation is generally set to run at night when evaporation is lowest. Again, this may be influenced by local watering restrictions.
Run times per zone are the primary controls for how much water you use. If we could get everybody’s run times optimized, it would make a huge difference to water bills and water usage. This topic can get complicated and so I am going to give a couple of guiding principles here and then create a separate blog article to address some of the complexity.
If you have point emitters, then use the fact that a single small shrub or large perennial that is a moderate water user, and is well established, will need about 2 gallons of water per week in Kelowna in July. Larger shrubs will need 4 gallons. This means that you should be running each drip zone for a total of two hours per week if you are using 1 gal/hour emitters. That could mean twice per week for 60 minutes per zone.
If you have a dripline system, then it makes more sense to use a square foot rule of thumb. Moderate water use plants that are well established will generally need about 0.6 gallons of water per square foot per week in Kelowna in July. This means that if you have a dripline with 1-gallon emitters built-in and the emitters are spaced 1 foot apart and the lines themselves are spaced 2 feet apart then you only need your zone to be on for a total of 60 minutes per week in Kelowna in July.
Seasonal percentage is an important parameter that is often neglected. Fig. 4 shows the variation of evapotranspiration (soil moisture evaporation plus plant transpiration) in Kelowna as a function of the time of year. This is measured in mm of moisture per day, and it relates directly to how much water is being used. This actual evapotranspiration varies a bit from one year to the next, but the overall pattern is very strong. July is the highest month for water use whereas September only requires 55% of the amount of water used in July. The averages for the main irrigation months are:
April – 55%
May – 75%
June – 90%
July – 100%
Aug – 90%
Sept – 55%
It is interesting to compare the rainfall chart for Kelowna for 2020 (Fig. 5). Note that the scale is the same between this chart and the previous chart for evapotranspiration. There were only 8 days with over 3 mm of rain in the late spring and summer in Kelowna whereas every day lost more than 3 mm of water to evapotranspiration. 2021 has been even worse. This is why we are so dependent on irrigation and why installing efficient irrigation and maintaining and scheduling correctly, matters so much.

Fig. 4 – Daily Evapotranspiraton for 2020 and seasonal percentages

Fig. 5 – Daily precipitation for 2020 in Kelowna
Hopefully this article will provide some knowledge to help properly maintain your drip irrigation system and provide a beautiful garden without wasting water.
i would like to plant some coreopsis, echinacea and rudbeckia (possibly a Russian sage over our septic field in Summerland. I have had these plants potted up for over a year. Do I need add lines to our drip irrigation system? This is a new build.
It is difficult to answer this question without knowing more about your set up. Most plants will generally need some irrigation in the Okanagan and drip is most efficient.